Bubble Remover Machine for Mobile Screen Refurbishing: Full Guide
17 November 2026 · LightspeedTools team
Short answer: A bubble remover machine (also called an autoclave or defoamer) is a sealed chamber that uses air pressure and gentle heat to squeeze the air left between glass, OCA and display after lamination. You load the freshly laminated screens, run the cycle the machine maker or OCA film maker recommends, and most small bubbles disappear. Bubbles that survive a correct cycle usually point to dust, poor lamination or edge lift, and those screens need to be re-laminated.
Every screen refurbishing line has the same weak point: lamination never gets out every trace of air. Even with a good vacuum laminator, tiny pockets stay trapped in the OCA (optically clear adhesive) film, especially near the edges and on curved glass. The bubble remover is the machine that turns a "nearly good" lamination into a sellable screen.
What a bubble remover machine actually does
After lamination the stack is front glass, OCA film and the display panel. Small air pockets sit between the layers. Inside the bubble remover the chamber is sealed and pressurised with compressed air while a heater warms the screens. Two things then happen together:
- Pressure pushes evenly on every square millimetre of the glass, compressing the trapped air and forcing the adhesive into full contact.
- Heat softens the OCA so it flows slightly, wets the surfaces and lets the compressed air dissolve into or escape through the adhesive.
The process is the same idea used in large-scale display and glass bonding, scaled down to a benchtop. It is not a fix for bad lamination. It finishes a good lamination. If you are new to the full process, our OCA laminating machine guide covers the step before this one.
Types of bubble remover machines
Machines in this category fall into a few practical groups. The right choice depends on screen sizes, daily volume and whether you also need a laminator.
Standalone autoclave or defoamer
A dedicated chamber that only removes bubbles. Shops that already own a laminator usually add one of these. Compact 7-inch units such as the Mini Autoclave Bubble Remover (7") and the Sunshine S-978C Mini Bubble Remover (7") suit phone screens and a small daily batch. The MaAnt T8 Mobile Phone Screen Defoamer Machine is another phone-focused option. For bigger panels, a larger chamber like the TBK-405 15-inch Mini LCD Screen Autoclave Bubble Remover Machine lets you run tablets or several phones per cycle.
Combined laminator and bubble remover
All-in-one units laminate and defoam in the same machine, which saves bench space and handling. Examples include the Mechanic iMark X 2-in-1 Laminator & Bubble Remover and the TBK-808A 13inch Vacuum Laminator Bubble Remover Machine. The trade-off: while one job runs, the other function waits. A busy shop often prefers separate machines so lamination and defoaming run in parallel.
Three-in-one machines
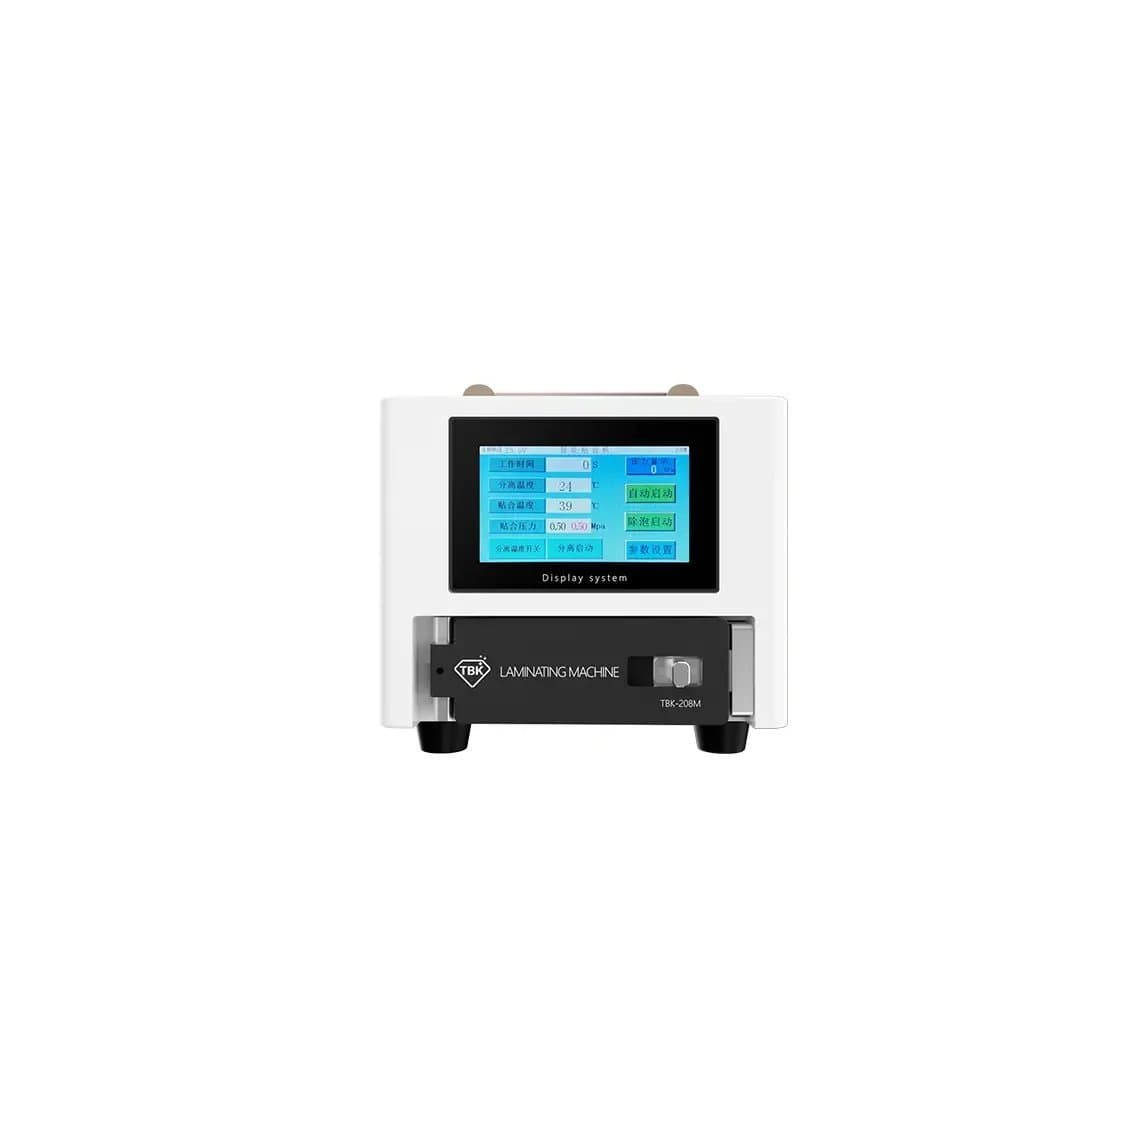
Some machines add an LCD separator, so one unit separates, laminates and defoams. The TBK-208M 3 in 1 LCD Separator Laminating and Defoaming All-in-one Machine is built for screens below 8.5 inches. These suit a starting refurbisher who wants one purchase, but throughput is limited because every step shares one machine.
Curved screen support
Curved-edge displays need a laminator and moulds made for curves, and the bubble remover must hold the screens without stressing the curved edges. The TBK-208C Curved Screen Laminating Bubble Remover Machine is designed with curved screens in mind. Always check the maker's list of supported screen types before buying for edge displays.
| Type | Best for | Main limit |
|---|---|---|
| Mini 7-inch autoclave | Phone screens, low to medium volume | Small chamber, few screens per cycle |
| Large chamber (13–16 inch) | Tablets, batch runs of phones | Needs more air and bench space |
| 2-in-1 laminator + remover | Small shops saving space | One function waits while the other runs |
| 3-in-1 separator + laminator + remover | Starting refurbishers | Lowest throughput per machine |
| Curved screen machine | Edge displays | Needs matching moulds and care with edges |
You can compare all current models in laminating and bubble removing machines, or see complete setups under screen refurbishing starter kits.
Before you start: what you need
- A clean, well-laminated screen. Bubble removal cannot fix dust or creases.
- A steady compressed air supply. Many machines need an external compressor; some have one built in. Check your model.
- The cycle settings (temperature, pressure, time) from the machine manual or the OCA film maker's sheet.
- Soft pads or trays so glass does not sit on hard edges. Some techs place an anti-bubble pad such as the 2UUL LD11 Anti-Bubble Lamination Pad during lamination to reduce bubbles before the chamber step.
- An ESD-safe bench and gloves. You are handling a display with exposed flex cables.
How to remove bubbles from a laminated phone screen
The exact numbers differ between machines, OCA brands and screen types. There is no universal setting, so treat the steps below as the workflow and take the values from your documentation.
- Inspect after lamination. Look at the screen under a bright light at an angle. Note where bubbles sit. Tiny scattered bubbles are normal. A visible speck of dust in the middle of a bubble is not something the chamber can remove.
- Let the machine warm up. Most units reach their set temperature before the cycle starts. Loading into a cold chamber can make results inconsistent.
- Load the screens flat. Glass side up on clean pads, flex cables folded safely so they do not get pinched by the door or touch the heater. Do not stack screens on top of each other.
- Close and lock the door properly. Make sure the seal is clean and seated. Most chambers will not pressurise if the lock is not engaged.
- Run the recommended cycle. Use the temperature, pressure and time from the manual or OCA film maker. Do not raise heat to speed things up; excess heat can damage polarisers and some panels.
- Wait for full depressurisation. Let the machine vent completely and show the cycle is finished before opening.
- Cool and re-inspect. Let screens cool to room temperature, then check again. If a few small bubbles remain, a second cycle sometimes clears them. If bubbles stay in the same place after that, the cause is in the lamination.
- Test the display. Connect to a test device or tester and check touch, colour and dead pixels before the screen goes into stock.
Why bubbles remain after the bubble remover
When a screen still shows bubbles after a correct cycle, the cause is almost always one of these:
- Dust or lint. A particle holds the layers apart and air collects around it. Pressure cannot flatten a solid speck. Better cleaning and a dust-free lamination area are the fix.
- Poor lamination. Weak vacuum, misaligned glass or an uneven mould leaves large air areas the chamber cannot clear.
- Edge lift. On curved glass or poorly fitted OCA, the edge peels slightly and lets air back in. These bubbles often grow back over hours.
- Old or badly stored OCA. Film past its useful life or stored warm and humid may not flow and bond properly.
- Too short or too cool a cycle. If you cut time or temperature below the recommendation, air does not have time to dissolve.
When re-lamination is the only fix
Re-lamination means separating the glass again, removing the OCA, cleaning and laminating fresh. Do it when:
- A bubble has dust or a fibre at its centre.
- Bubbles remain in the same spot after two proper cycles.
- The OCA shows creases, lines or a wavy pattern.
- Bubbles return along an edge after the screen rests overnight.
Each separation adds risk to the display, so the real saving comes from getting lamination right first time. The step-by-step screen refurbishing walkthrough covers separation, glue removal and cleaning in detail.
Safety: you are running a pressure vessel
A bubble remover is a small pressure chamber. Treat it with the same respect as any compressed air equipment.
- Never open the door under pressure. Wait until the machine shows zero pressure and the cycle has fully ended. Never force or bypass the door lock.
- Do not exceed the rated pressure. Keep regulator and compressor settings within the machine's specification.
- Follow the maker's checks. Inspect the door seal, gauge and safety valve as the manual recommends. Stop using the machine if the gauge behaves oddly or the door does not lock firmly.
- Heat burns. Chamber walls, trays and screens can be hot after a cycle. Use gloves.
- Never put batteries or complete phones inside. Heat and pressure on a lithium battery is a fire risk. Only bare screen assemblies go in the chamber.
- Use a stable bench and grounded power. Keep the vent outlet clear and away from faces.
Maintenance that keeps results consistent
- Door seal: wipe it clean and check for cracks, flattening or cuts. A leaking seal means the chamber cannot hold pressure and cycles become weak. Replace it when worn.
- Air supply: drain the compressor tank and water trap regularly. Moisture and oil in the air line can reach the chamber. Check hoses and fittings for leaks.
- Filters: clean or replace inlet filters if your model has them.
- Chamber and trays: keep them free of dust and adhesive residue, since anything in the chamber can end up on the glass.
Common mistakes
- Expecting the bubble remover to rescue dusty lamination.
- Raising temperature above the recommendation to save time.
- Opening the door the moment the timer ends instead of waiting for zero pressure.
- Letting flex cables hang over tray edges where the door can pinch them.
- Running a cheap noisy compressor with no water trap.
- Skipping the cooling time and judging bubbles while the OCA is still warm.
If you are planning machines as part of a business, the guide to starting a screen refurbishing business covers how a bubble remover fits into the full production line.
Questions
Do I need a bubble remover if I have a vacuum laminator?
For consistent results, yes. A vacuum laminator removes most of the air, but small bubbles usually remain, especially at the edges. The bubble remover finishes the job with pressure and heat, which is why many machines combine both functions.
Can a bubble remover fix bubbles under a screen protector?
Bubble removers are designed for OCA lamination between cover glass and display, not for screen protectors on a finished phone. Never put a complete phone with a battery inside the chamber. Protector bubbles are usually fixed by re-applying the protector.
How long does a bubble removing cycle take?
It depends on the machine, the OCA film and the screen size, so follow the maker's recommendation. Allow extra time for warm-up before the cycle and for cooling afterwards before you inspect the result.
Why do bubbles come back a day after lamination?
Returning bubbles usually mean edge lift, poor contact from lamination or a cycle that was too short or too cool. Old or badly stored OCA can also cause it. If bubbles return along the edge, re-lamination is usually needed.
Compare chambers, all-in-one units and curved screen models in laminating and bubble removing machines, or browse the full range of screen refurbishing machines. Repair businesses can unlock trade pricing through wholesale and reorder by SKU or CSV with Quick Order.